Quilts in the Mill Photos

Better late than never!  Nearly 3 weeks after the show ended and I’m finally catching up on things!  The next few posts will give you a glimpse of the show.  We had almost 950 attendees over 3 days.  Not bad for nearly getting rained out.  If you weren’t able to attend this time, hopefully this will tempt you for next time – Oct 5, 6, 7 2012.  Might as well mark your calendar now!  Disclaimer: I stepped in in the spring to co-chair this show just past and am already the co-chair for the next show.

These are 3 of the Prallsville Mills buildings that we used for the show this year.  For the past 8 shows we have used 3 levels of just the 2 larger ones (which are connected on the inside), but this year we spread out to 4 buildings.   The mill is in Stockton, NJ right on the Delaware River.  It’s a quaint little town and just beautiful in the fall.

Prallsville Millsentrance.jpgsawmill.jpg

Here is the back of the grist mill.  On Friday, the river threatened to rise overnight up to the red door on the far right.  The mill management, worried about flooding, offered space in the Wheel House (the gray building to the far right in the picture above.)  So any guild member who happened to be there at 5:00 on Friday helped to move the 4 vendors that had set up in the lower level of the white building.  Talk about a great volunteer effort!  The vendors could not get over over how quickly we helped them move and get set up again!

back-of-mill.jpg

Here’s the raging Delaware that threatened to knock on our back door!

river.jpg

The next post will have more pictures from the inside.

Helle-May

Quilts in the Mill

Just wanted to let everyone know about a great local quilt show that’s coming up! 

Quilts in the Mill is put on by my guild, the Courthouse Quilters (www.Courthousequilters.com), every other year at the Prallsville Mills on Rt 29 in Stockton, NJ.  Stockton is a beautiful little town nestled on the Delaware River in historic Hunterdon County, NJ.

The show is open Friday- Sunday, October 1-3 from 10:00 to 5:00 each day.  Tickets are $7.00.  A portion of the proceeds goes to benefit the Mills.  This year’s show is housed in both the main mill and the SawMill.  Be sure to visit both buildings!

What you can expect:

  • Of course there will be plenty of beautiful quilts on display.  They are all made by our very talented and diverse membership.
  • Vendors!  What’s a quilt show without great vendors!  We have 12 of them!
  • Chinese FireworksRaffle quilt.  Our raffle quilt this year is adapted (with permission) from “Chinese New Year,” a pattern by Heather Purcell and Annie Unrein.  Bright batik fireworks burst from a black background!  Amazing firework quilting by Diana Leslie.  The quilt is 83″ x 98.”  Tickets are $1 each or 6 for $5.

 chq-chinese-fireworks-web.jpg

  • 52 Minis at the Mill are also available for raffle!
  • Quilting Demos every day.
  • Quilters Boutique where you you’re sure to find something to bring home!
  • Lots of Door Prizes!
  • The “Bra Brigade”  Member decorated bras on display and available as a calendar for purchase ($10).  All proceeds from the calendars to benefit Hunterdon Healthcare Cancer Center.
  • ConKerr Cancer Pillowcase collection point, demos, and work area.
  • Storybook Quilts:  A collection of travelling quilts (to local schools and libraries) and the children’s books that inspired them.
  • Friday only:  George Siciliano on hand to demo his paper-pieced miniature quilts.
  • Saturday and Sunday:  Author, Dalen Keys, on hand to sell and sign his children’s book, Just a Quilt?
  • Food by Dish Caterers

That ought to keep you busy for the day!  Make it a fall getaway weekend and enjoy the beauty of the area on both sides of the river!  New Hope, PA, and Lambertville and Frenchtown NJ  are just minutes away!

Questions?  Just ask!

See you there! 

Helle-May

The final wedding post

As promised, a few more quilt pictures from the wedding.

I gave the quilt to Liina and Harald several days before the wedding so that I would have a chance to explain my gift to them.  Liina is a chemical engineer and like any good engineer, she had the wedding planned down to the smallest detail.  (OK, I guess it runs in the blood!)  Anyway, she knew exactly when she wanted me to present it, so that the guests would have ample opportunity to sign it.  After we all arrived at the reception site, we all gathered on the terrace for a champagne toast, a few wedding games, and the signing of the quilt. 

Here I am explaining the quilt to the guests.  That’s my Secret Service looking husband holding the quilt and my son looking on.

introducing-quilt-web.jpg

My cousin Katrin adding her signature!  I brought scrap fabric for test runs and Pigma pens.

signing-web.jpg

After we were pretty sure we had everyone’s signature, I hung the quilt on a convenient curtain rod.  Here is Harald and Liina in her traditional dress.  As is the custom, she changed at midnight and her mother and mother-in-law donned her with her apron and hat, signifying her new status as a married woman.

quilt-couple-web.jpg

The wedding was still going strong at 3:30 when we finally called it a night.  What a fun time!  We were so glad to have been able to attend!  Now, nearly 4 weeks later I think the happy couple should be arriving home from their honeymoon to Australia.  I think it was the only continent they hadn’t been to! 

Summer is nearly done, but we still have one more big wedding to attend: my husband’s cousin from Boston.  We will be driving up to Connecticut for that one over Labor Day weekend.   At least this one’s close – but given Labor Day traffic on I95, it could take nearly as long as a trip to Estonia! 

It was a fun-filled summer, but the kids and I are ready for school to start.  Only 11 more days – but who’s counting?!

Helle-May

P.S.  There’s a rumor going around that my last unattached cousin is close to tying the knot!  I’m not sure I can make it back 3 summers in a row!  Keep your fingers crossed that she’ll wait at least a little longer! 

Finally – the quilt!

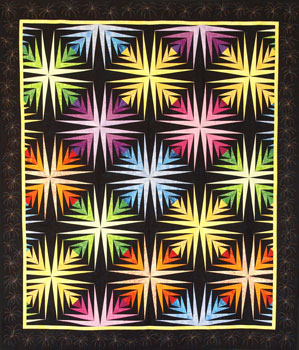
Don’t know why it’s taken me so long to finally get this picture up.  Since getting back home, I’ve had a mile long to-do list and at times I just don’t know what to tackle next!  So without further ado here is the completed wedding quilt!

liinas-finished-wedding-qu.jpg

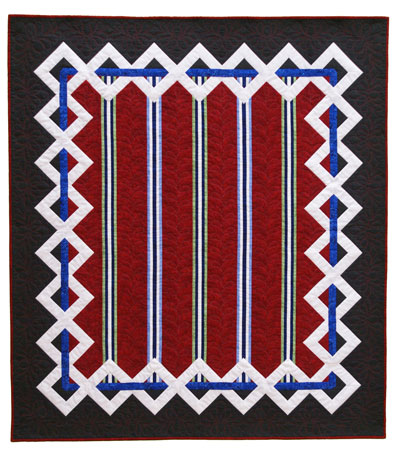
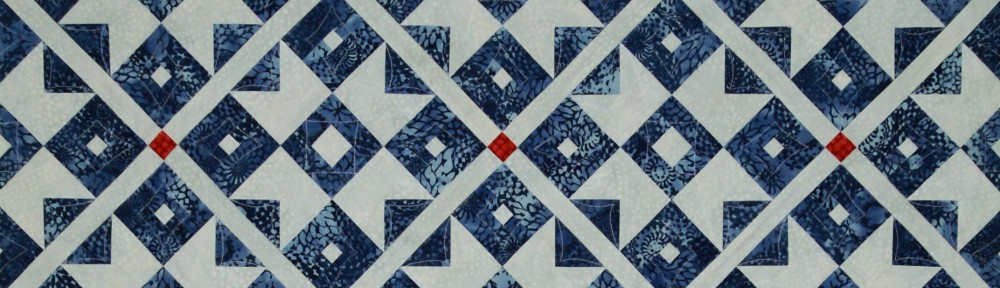
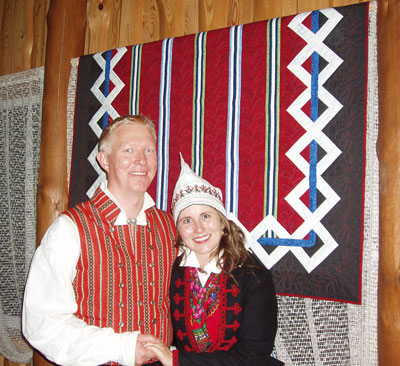
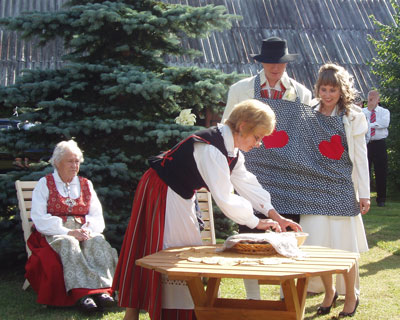
My vision was for the quilt to reflect both the Estonian and Norwegian cultures that were being merged in Liina and Harald’s marriage.  The colors in the quilt are representative of both national flags:  Estonian (blue, black and white) and Norwegian (blue, red and white).  The center of the quilt is a patchwork version of the traditional wool material that Liina wove herself and made into a skirt that she wore at the wedding.  The white chain with blue ribbon weaving in and out represents the merging of the two sets of families and friends that are now linked together

  estonian-flag-web.gif  norwegian-flag-web.gif

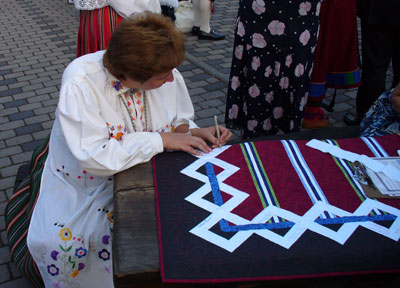
My intent was to have the wedding guests sign the quilt in the white chain.   So during the design process I had to ask Liina how many guests would be attending in order to have enough spots.    She obliged with exact counts.  She was a little curious about why I wanted to know. 

The quilt measures 49″ x 55.”  The number of links in the chain determined the overall size of the quilt.  The other determining factor for size was that I knew I wanted to be able to carry it on the plane with me.  There was no way I was going to trust the airline baggage crew!

For the quilters out there, a little more on the construction of the quilt.  This quilt was probably one of the most complex designs I have come up with.  I used EQ7 to design it using the custom layout format.  The center stripes were easy strip sets.  However, the border was another story.  I wanted the chain to appear to be on top of the quilt and I wanted those chain link corners to be mitered.  I can be so demanding!  The most accurate way I could figure to do it was by paper-piecing the chain.  Each “link” of chain is  actually constructed of 2 paper pieced sections that are sewn along the center of the blue ribbon.  As is often the case when I come up with crazy ideas like this, I also had to “invent” a new technique so I could miter the corners within the paper-pieced sections.  I have to give credit to Susan Cleveland for giving me the inspiration and technical clues on how to accomplish this.   

Once I figured that part out, the chain sections went together relatively quickly.  My next challenge was to figure out how to inset the points of the chain into the stripes.  Yes, those points are inset into the ends of the stripes, not sewn on top, like a normal person would have done!  Let’s just say that I thought about that part for 2 days and made countless trials before actually attempting it on the real thing.  I wiped a lot of sweat off my brow when that part was done!  Because, oh yeah, did I mention I didn’t have any extra red fabric in case I made a mistake!

So, when all was said and done, there were 60 mitered corners and 14 inset seams (in addition to the challenges with the stripes, there were 4 more weird pieces in the corner I had to inset – I won’t even try to explain!)  And my friend Connie wants to know if I’m going to write a pattern for this one!  I think I’m the only one crazy enough to attempt it.  I can’t even begin to think how I would write the directions!

I accomplished all of this in 3 crazy weeks, including all of the the quilting on my Janome.  For that reason, I have told everyone that this quilt is dedicated to my children, who knew not to bother the crazed mommy-quilter for those weeks right after school let out.  As a reward, we did go to the pool nearly every afternoon.  For them, it was fun.  For me, it was a great way to clear my head each day before heading back to the laboratory I call my sewing room!

Next post:  pictures of the quilt at the wedding!

Helle-May

The Wedding

I have been putting off posting this blog, because I honestly didn’t know where to begin!  Most daunting was to pick from the hundreds of photos we took and shared (gotta love digital pics!). 

The wedding officially started on Friday night with a pre-party at Liina’s father’s house.  This was a great informal opportunity for the 100 or so guests to get to know each other.  About half of the guests were from Norway, but despite the fact that nearly all of the Norwegians spoke English, we all received a trifold of key word/phrase translations in Estonian/Norwegian and English. 

Saturday, however was the big day.  My family gathered at our home to get ready.  All wedding guests (Estonian and Norwegian) were encouraged to wear their national dress.  So here I am (on the left end) with my cousins.

the-girls-web.jpg

The wedding was held at the local Lutheran church (notice the age of the church – 1534 AD)

wedding-party-web.jpg

My boys (on the ends) were asked to help the flower girls hold all of the flowers that the bride was given after the ceremony.  This is traditional.  What was really clever, was that Liina had hired a local florist to arrange all of the flowers into beautiful arrangements for the reception.

 flowers-web.jpg

After the wedding ceremony, the bride and groom led a parade of cars through the countryside with a stop at Liina’s mother’s house.  Although they were already married, the bride and groom were required to accomplish a series of tasks to prove that they were ready for marriage.  Harald had to prove he could chop wood, Liina had to darn a sock and finally, wearing an apron made for 2, they had to peel a potato together.  All of the tasks had to meet the approval of the grandmothers seated behind them.  It was great fun!

potatoes-web.jpg

Finally, we arrived at the “tourist farm” where the reception was held.  Difficult to explain, check out the website to see pictures.  www.uueda.ee  It is like a resort with many different sized buildings for lodging as well as a central building with a reception hall.  The reception was loads of fun, including all of the usual events – just with an Estonian twist.  The main difference was that when we left sometime after 3:00 am – the party was still going strong!

One last picture of all of the guests, Estonian and Norwegian, who wore national dress.

all-costimes-web.jpg

I could bore you with lots more pictures, but I’ll stop here.  The next post will be all about the quilt!

Helle-May

Home again!

Just got back yesterday from 2  weeks in Estonia spending time with family and attending my cousin’s  wedding.  The time was too short and too filled to post blogs in real time – so this year I’m doing it afterwards.  For the next week or so I’ll be posting about our adventures!

This was my fifth time in Estonia since the coutry re-gained independence in ’91.  Amazingly, my boys have been there 3 times already – all in the last 5 years.  Each time we go it gets more and more comfortable and easierto settle in.  We stay with my first cousin, Ulle and her husband, Mati in the small house my father helped to build before he died way too early of lung cancer.  The house sits on the family homestead in the countryside outside of Parnu, the summer capital of Estonia.  My unlce Peter, his wife, Milvi, and their grown children, Annika and Andres also call this home. 

Although we spent 3 weeks visiting just last year, we couldn’t not come again this summer.  A month after we got home last summer, I got the expected phone call from Liina, that she and her Norwegian boyfriend, Harald, were getting married.  Much to Liina’s dismay, he waited until after we got home from that long-planned trip to propose.  I think secretly Harald knew I couldn’t resist another trip back!

Anyway, I have more photos and memories to share once I get myself a little organized and re-oriented.  Stay tuned!

Helle-May

Engineering vs. Art

eng-drawing.jpg 

 My son came across this definition on an educational/fun website yesterday.  Never thought about it this way:

Engineering is design with function.  Art is design without function.”

So I can finally answer the question, “Am I an engineer or an artist?” The straight answer would be:  “If I am designing a bed quilt, I am an engineer.  If I am designing a wall-hanging, I am an artist.” 

But nothing is ever that simple!  Regardless of what I am designing, I know that I first approach the task as an artist, drawing what I think looks pleasing to the eye.  Then I put on my engineer’s hat and figure out how in the world I’m going to construct it!  For me, it usually means eliminating as many seams as possible while at the same time making it realistic to sew.  This often means some tweaking of the original design, playing with the geometry and developing a new technique (to me at least!)  No surprise:  this is the part I like most!  

The funny thing is, the course I liked least in college was Mechanical Drawing/Drafting!  I’ll blame it on the professor – he couldn’t have made it less inspiring! (but then again I don’t know how he could have made it more exciting either!)

Just a little food for thought on this holiday weekend!  Now I have to get back to the real food!  We’re having friends over later and I have to get cooking!  Happy 4th!

Helle-May

It’s Ok to Cut Corners!

That top secret project I mentioned last time is coming along nicely.  Of course, now that the boys are out of school, finding time to sew is a bit more challenging – but it will get done – somehow!

It’s 9:45 on Sunday night, the boys are finally in bed!  I’ve been wanting to write about a template set I saw demonstrated at Market and of course, just had to have – the “Cutting Corners” template set by Toby Lischko of Gateway Quilts & Stuff.

 Cutting Corners Template

Unlike many templates that are meant just for one particular quilt design, these templates make many kinds of blocks (flying geese, half square triangles, snowball blocks, etc.) just a little bit simpler! 

You know all those times, the directions tell you to draw a diagonal line across a square, sew along the line and then cut the corner off leaving a 1/4″ seam allowance?  Well, these templates eliminate the need to draw that line!  Align the template according to the directions and you will cut off the exact corner needed to leave that 1/4″ seam allowance.  Then all you have to do is sew your usual 1/4″ seam from the edge and you’re done! Presto!  Now why didn’t I think of that?!  This template set could be used with several of my patterns! 

There are two pieces in the set along with great instructions on the many uses for them.  I used the triangle templates to piece together my binding strips for the library quilt.  Worked like a charm!  Didn’t draw a single line to get those perfect diagonal seams!

Check it out at for yourself at  www.gatewayquiltsnstuff.com !  While you’re there, take a look at all of Toby’s beautiful quilts and patterns.  She and I both have a love for taking the traditional and giving it a bit of a twist! 

 Helle-May

Top Secret

My friend Connie e-mailed me the other day to say my blog was eerily silent, so I thought I better give a little explanation! 

SHhhhhhh!  I am working on a top secret project!!!  I can’t even blog about it because the intended receiver reads my blog!  So here’s a little hint:  we’re going to my cousin’s wedding in Estonia later this summer (yes, the Estonian one that’s marrying the Norwegian, that she met in South Africa,  who proposed in Canada!) and I have to bring a present!

I started working on the design right after I finished the library quilt.  Tons of end of school year activities ate into my time, but I finally started working on it on Monday.  Had to invent a new technique to get it to come out just the way I wanted!  Can’t wait to share – but you’ll have to wait until after the wedding! SHhhhhhhhh!!!!  Don’t tell!

Helle-May